- Latest available (Revised)
- Original (As made)
The Ammonium Nitrate Materials (High Nitrogen Content) Safety Regulations 2003
You are here:
- UK Statutory Instruments
- 2003 No. 1082
- SCHEDULE 2

What Version
Advanced Features
- Show Geographical Extent(e.g. England, Wales, Scotland and Northern Ireland)
- Show Timeline of Changes
More Resources
Changes to legislation:
There are currently no known outstanding effects for the The Ammonium Nitrate Materials (High Nitrogen Content) Safety Regulations 2003, SCHEDULE 2.

Changes to Legislation
Revised legislation carried on this site may not be fully up to date. At the current time any known changes or effects made by subsequent legislation have been applied to the text of the legislation you are viewing by the editorial team. Please see ‘Frequently Asked Questions’ for details regarding the timescales for which new effects are identified and recorded on this site.
Regulation 2
SCHEDULE 2E+W+SDETONATION RESISTANCE TEST
A. DESCRIPTION OF THE DETONATION RESISTANCE TEST FOR RELEVANT AMMONIUM NITRATE MATERIALE+W+S
1. Before being tested for resistance to detonation, the whole mass of the sample of the relevant ammonium nitrate material is to be thermally cycled five times in accordance with the following method (Note 1) for the application of thermal cycles:E+W+S
(1) Principle and definition
In a watertight box heat the sample from ambient temperature to 50 °C and maintain at this temperature for a period of one hour (phase at 50 °C). Then cool the sample until a temperature of 25 °C is achieved and maintain at that temperature for one hour (phase at 25 °C). The combination of the successive phases at 50 °C and 25 °C forms one thermal cycle. After being subjected to the required number of thermal cycles, the test sample is held at a temperature of 20 ± 3 °C pending the execution of the detonation test.
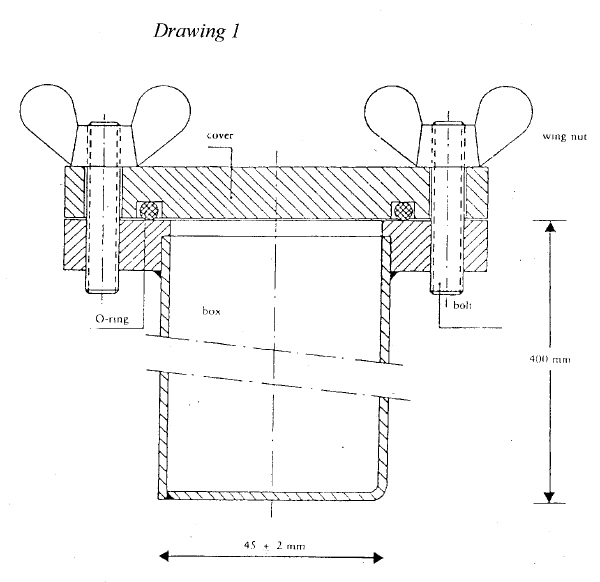
(2) Apparatus
(i)A water bath, thermostated in a temperature range of 20 to 51 °C with a minimum heating and cooling rate of 10 °C/h, or two water baths, one thermostated at a temperature of 20 °C, the other at 51 °C. The water in the bath(s) is continuously stirred; the volume of the bath should be large enough to guarantee ample circulation of the water.
(ii)A stainless steel box, watertight all around and provided with a thermocouple in the centre. The outside width of the box is 45 (± 2) mm and the wall thickness is 1.5 mm (see Drawing 1). The height and length of the box can be chosen to suit the dimensions of the water bath, e.g. length 600 mm, height 400 mm.
(3) Procedure
Place a quantity of ammonium nitrate material sufficient for a single detonation into the box and close the cover. Place the box in the water bath. Heat the water to 51 °C and measure the temperature in the centre of the material. One hour after the temperature at the centre has reached 50 °C cool the water. One hour after the temperature at the centre has reached 25 °C heat the water to start the second cycle. In the case of two water baths, transfer the box to the other bath after each heating/cooling period.
2. The material must be subjected to the test of resistance to detonation in a horizontal steel tube under the following conditions:E+W+S
(a)A seamless steel tube of length: 1,000 mm at least, and nominal external diameter: 114 mm at least, and nominal wall thickness: 5 mm at least.
(b)Booster: the type and mass of the booster chosen should be such as to maximize the detonation pressure applied to the sample in order to determine its susceptibility to the transmission of detonation.
(c)Test temperature: 15-25 °C.
(d)Witness lead cylinders for detecting detonation: 50 mm diameter and 100 mm high placed at 150 mm intervals and supporting the tube horizontally.
B. DETERMINATION OF RESISTANCE TO DETONATIONE+W+S
1. PrincipleE+W+S
The test sample is confined in a steel tube and subjected to detonation shock from an explosive booster charge. Propagation of the detonation is determined from the degree of crushing of lead cylinders on which the tube rests horizontally during the test.
2. MaterialsE+W+S
(a)Plastic explosive containing 83 to 86% penthrite (Note 2)
Density: 1,500 to 1,600 kg/m3
Detonation velocity: 7,300 to 7,700 m/s
Mass: 500 ± 1 gram.
(b)Seven lengths of flexible detonating cord with non-metallic sleeve
Filling mass: 11 to 13 g/m
Length of each cord: 400 ± 2 mm.
(c)Compressed pellet of secondary explosive, recessed to receive detonator
(d)Explosive: hexogen/wax 95/5 or tetryl or similar secondary explosive, with or without added graphite.
Density: 1,500 to 1,600 kg/m3
Diameter: 19 to 21 mm
Height: 19 to 23 mm
Central recess to receive detonator: diameter 7 to 7.3 mm, depth 12 mm.
(e)Seamless steel tube as specified in ISO 65 of the International Organisation for Standardisation M1 (carbon steel tubes suitable for screwing in accordance with ISO 7-1 -Pipe threads where pressure tight joints are made on threads)—Heavy Series, with nominal dimensions DN 100 mm
Outside diameter: 113.1 to 115.0 mm
Wall thickness: 5.0 to 6.5 mm
Length: 1,005 (± 2) mm.
(f)Bottom plate
Material: steel of good weldable quality
Dimensions: 160 × 160 mm
Thickness: 5 to 6 mm.
(g)Six lead cylinders
Diameter: 50 (± 1) mm
Height: 100 to 101 mm
Materials: soft lead, at least 99.5% purity.
(h)Steel block
Length: at least 1,000 mm
Width: at least 150 mm
Height: at least 150 mm
Mass: at least 300 kg if there is no firm base for the steel block.
(i)Plastic or cardboard cylinder for booster charge
Wall thickness: 1.5 to 2.5 mm
Internal diameter: 92 to 96 mm
Height: 64 to 67 mm.
(j)Detonator (electric or non-electric) with initiation force 8 to 10
(k)Wooden disc
Diameter: 92 to 96 mm. Diameter to be matched to the internal diameter of the plastic or cardboard cylinder.
Thickness: 20 mm.
(l)Wooden rod of same dimensions as detonator.
(m)Dressmaking pins (maximum length 20 mm).
Marginal Citations
M1ISO 65:1981.
3. ProcedureE+W+S
Preparation of booster charge for insertion into steel tube.
There are two methods of initiation of the explosive in the booster charge, depending on the availability of equipment.
(1) First Method: Seven-point simultaneous initiation.
The booster charge prepared for use is shown in Drawing 2.
(i)
Drill holes in the wooden disc parallel to the axis of the disc through the centre and through six points symmetrically distributed around a concentric circle 55 mm in diameter. The diameter of the holes must be 6 to 7 mm (see Section A-B in Drawing 2), depending on the diameter of the detonating cord used.
(ii)
Cut seven lengths of flexible detonating cord each 400 mm long, avoiding any loss of explosive at each end by making a clean cut and immediately sealing the end with adhesive. Push each of the seven lengths through the seven holes in the wooden disc until their ends project a few cm on the other side of the disc. Then insert a small dressmaking pin transversally into the textile sleeve of each length of cord 5 to 6 mm from the end and apply adhesive around the outside of the lengths of cord in a band 2 cm wide adjacent to the pin. Finally, pull the long piece of each cord to bring the pin into contact with the wooden disc.
(iii)
Shape the plastic explosive to form a cylinder 92 to 96 mm in diameter, depending on the internal diameter of the cylinder at 2(i). Stand the cylinder at 2(i) upright on a level surface and insert the shaped explosive. Then insert the wooden disc. The diameter of the disc must always correspond to the inside diameter of the cylinder at 2(i). Carry the seven lengths of detonating cord into the top of this cylinder and press it down onto the explosive. Adjust the height of the cylinder (64 to 67 mm) so that its top edge does not extend beyond the level of the wood. Finally, fix the cylinder at 2(i) to the wooden disc for instance with staples or small nails, around its entire circumference.
(iv)
Group the free ends of the seven lengths of detonating cord around the circumference of the wooden rod so that their ends are all level in a plane perpendicular to the rod. Secure them in a bundle around the rod by means of adhesive tape. When the six peripheral lengths of cord are taut after assembly, the central cord must remain slightly slack.
(2) Second Method: Central initiation by a compressed pellet.
The booster charge prepared for use is shown in Drawing 3.
(i)
Prepare a compressed pellet.
(ii)
Taking the necessary safety precautions, place 10 grams of a secondary explosive in a mould with an inside diameter of 19 to 21 mm and compress to the correct shape and density.
(iii)
The ratio of diameter: height should be roughly 1: 1.
(iv)
In the centre of the bottom of the mould there is a peg, 12 mm in height and 7.0 to 7.3 mm in diameter (depending on the diameter of the detonator used), which forms a cylindrical recess in the compressed cartridge for subsequent insertion of the detonator.
(v)
Prepare the booster charge
Place the explosive into the cylinder at 2(i) standing upright on a level surface, then press it down with a wooden die to give the explosive a cylindrical shape with a central recess. Insert the compressed pellet into this recess. Cover the cylindrically shaped explosive containing the compressed pellet with a wooden disc having a central hole 7.0 to 7.3 mm in diameter for insertion of a detonator. Fix the wooden disc and the cylinder together with a cross of adhesive tape. Ensure that the hole drilled in the disc and the recess in the compressed pellet are coaxial by inserting the wooden rod.
4. Preparing steel tubes for the detonation tests.E+W+S
(a)At one end of the steel tube, drill two diametrically opposed holes 4 mm in diameter perpendicularly through the side wall at a distance of 4 mm from the edge.
(b)Butt weld the bottom plate to the opposite end of the tube, completely filling the right angle between the bottom plate and the wall of the tube with weld metal around the entire circumference of the tube.
5. Filling and charging the steel tube. (see Drawings 2 and 3)E+W+S
(a)The test sample, the steel tube and the booster charge must be conditioned to temperatures of 20 (± 5) °C. 16 to 18 kg of the test sample are needed for two detonation tests.
(b)Place the tube upright with its square bottom plate resting on a firm, flat surface, preferably concrete. Fill the tube to about one-third of its height with a portion of test sample and drop it 10 cm vertically onto the floor five times to compact the prills or granules as densely as possible in the tube. To accelerate compaction, vibrate the tube by striking the side wall with a 750 to 1,000-gram hammer between drops for a total of 10 times.
(c)Repeat this charging method with another portion of the test sample.
(d)Finally, a further addition shall be made such that, after compaction by raising and dropping the tube 10 times and a total of 20 intermittent hammer blows, the charge fills the tube to a distance of 70 mm from its orifice.
(e)The filling height of the sample must be adjusted in the steel tube so that the booster charge (prepared by either of the two methods in paragraphs 3(1) and (2) above) to be inserted later will be in close contact with the sample over its entire surface.
(f)Insert the booster charge into the tube so that it is in contact with the sample; the top surface of the wooden disc must be 6 mm below the end of the tube. Ensure essential close contact between explosive and test sample by adding or removing small quantities of sample. As shown in Drawings 2 and 3, split pins should be inserted through the holes near the open end of the tube and their legs opened flat against the tube.
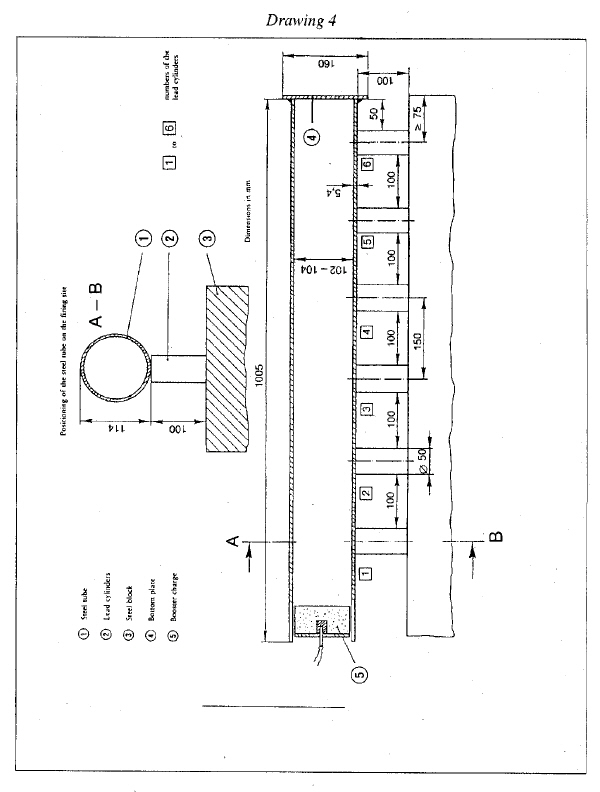
6. Positioning of the steel tube and lead cylinders (see Drawing 4).E+W+S
(a)Number the bases of the lead cylinders at 2 (g) 1 to 6. Make six marks 150 mm apart on the centre line of the steel block at 2 (h) lying on a horizontal base, with the first mark at least 75 mm from the edge of the block. Place a lead cylinder upright on each of these marks, with the base of each cylinder centred on its mark.
(b)Lay the steel tube (prepared, filled and charged according to 4 and 5 above) horizontally on the lead cylinders so that the axis of the tube is parallel to the centre line of the steel block and the welded end of the tube extends 50 mm beyond lead cylinder marked as number 6. To prevent the tube from rolling, insert small wooden wedges between the tops of the lead cylinders and the tube wall (one on each side) or place a cross of wood between the tube and the steel block.
(c)Make sure that the tube is in contact with all six lead cylinders; a slight curvature of the tube surface can be compensated for by rotating the tube about its longitudinal axis; if any of the lead cylinders is too tall, tap the cylinder in question carefully with a hammer until it is the required height.
7. Preparation for detonation.E+W+S
(a)Set up the apparatus (according to 3 to 6 above) in a bunker or suitably prepared underground site (e.g. mine or tunnel) Should such firing sites not be available, the work can, if necessary, be done in a concrete-lined pit covered over with wooden beams. Ensure that the temperature of the steel tube is kept at 20 (± 5) °C before detonation.
(b)If the booster charge with seven-point initiation is used, ensure that the detonation cords are stretched out (as described in 3(1)(iv) above) and arranged as horizontally as possible.
(c)Finally, remove the wooden rod and replace with the detonator. Do not carry out firing until the danger zone has been evacuated and the test personnel have taken cover.
(d)Detonate the explosive.
(e)Allow sufficient time for the fumes (gaseous and sometimes toxic decomposition products such as nitrous gases) to disperse, then collect the lead cylinders and measure their heights with a Vernier caliper.
8. Record for each of the marked lead cylinders, the degree of crushing expressed as a percentage of the original height of 100 mm. If the cylinders are crushed obliquely, record the highest and the lowest values and calculate the average.E+W+S
9. A probe for continuous measurement of the detonation velocity can be used; the probe should be inserted longitudinally to the axis of the tube or along its side wall.E+W+S
10. Two detonation tests per sample are to be carried out.E+W+S
11. Test report.E+W+S
Values for the following parameters are to be given in the test report for each of the detonation tests:
(a)
the values actually measured for the outside diameter of the steel tube and for the wall thickness,
(b)
the Brinell hardness of the steel tube,
(c)
the temperature of the tube and the sample shortly before firing,
(d)
the packing density (kg/m3) of the sample in the steel tube,
(e)
the height of each lead cylinder after firing, specifying the corresponding cylinder number, and
(f)
method of initiation employed for the booster charge.
12. Evaluation of test results.E+W+S
If, and only if, in each firing, the crushing of at least one lead cylinder is less than 5%, the sample shall be determined to be resistant to detonation. Otherwise it shall be determined to be not resistant to detonation.
Note 1: In so far as it is consistent with the procedures set down in [F1Annex 3 to Regulation (EC) No 2003/2003 of the European Parliament and of the Council relating to fertilisers] for the testing of straight ammonium nitrate fertilisers an alternative method in accordance with this note may be adopted for the application of thermal cycling—
(1) Principle and definition
Heat the sample from ambient temperature to 50 °C and maintain at this temperature for a period of one hour (phase at 50 °C). Then cool the sample until a temperature of 25 °C is achieved and maintain at that temperature for one hour (phase at 25 °C). The combination of the successive phases at 50 °C and 25 °C forms one thermal cycle. After being subjected to the required number of thermal cycles, the test sample is held at a temperature of 20 ± 3 °C pending the execution of the detonation test.
(2) Apparatus
Two different methods using ovens can be utilised for conditioning the test samples. Method 1 employs a single oven capable of being thermostatically controlled to temperatures of 50 °C and 25 °C and with a minimum heating and cooling rate of 10 °C/h. Method 2 employs 2 ovens, one thermostatically controlled to 50 °C and the other controlled to 25 °C.
(3) Procedure
(a)Divide approximately 20 kg of the sample of relevant ammonium nitrate material into eight roughly equal portions and place them in identical polythene bags made air-tight using a heat sealing device.
(b)Insert a suitable thermocouple into one of the portions through the wall of the polythene bag and tape it into place.
(c)Place the bags in an oven at 50 °C and once the thermocouple indicates that the portions have attained this temperature maintain them at that temperature for one hour.
(d)The bags must then either be removed from the oven and be placed in another oven at 25 °C (method 2) or the oven thermostat must be reset to 25 °C (method 1).
(e)Once the portions have cooled to 25 °C they must be maintained at that temperature for one hour.
(f)Repeat the thermal cycles four more times and then maintain the bags and their contents at a temperature of 20 ± 3 °C pending execution of the detonation tests.
(g)Discard the material from the bag containing the thermocouple and perform the detonation tests on the material from the other seven bags.
Note 2: In so far as it is consistent with the procedures set down in [F2Annex 3 to Regulation (EC) No 2003/2003 of the European Parliament and of the Council relating to fertilisers] for the testing of straight ammonium nitrate fertilisers an alternative plastic explosive may be used that contains 86% to 90% cyclonite, with a density of between 1,550 to 1,650 kg/ m3, and a detonation velocity of between 8,000 to 8,400 m/s, Mass 500 ± 1 gram.


Textual Amendments
F1Words in Sch. 2 para. 12 substituted (15.3.2019) by The Fertilisers and Ammonium Nitrate Material (Amendment) (EU Exit) Regulations 2019 (S.I. 2019/601), regs. 1(2), 3
F2Words in Sch. 2 para. 12 substituted (15.3.2019) by The Fertilisers and Ammonium Nitrate Material (Amendment) (EU Exit) Regulations 2019 (S.I. 2019/601), regs. 1(2), 3
Options/Help
Print Options
PrintThe Whole Instrument
PrintThis Schedule only
Legislation is available in different versions:
Latest Available (revised):The latest available updated version of the legislation incorporating changes made by subsequent legislation and applied by our editorial team. Changes we have not yet applied to the text, can be found in the ‘Changes to Legislation’ area.
Original (As Enacted or Made): The original version of the legislation as it stood when it was enacted or made. No changes have been applied to the text.
See additional information alongside the content
Geographical Extent: Indicates the geographical area that this provision applies to. For further information see ‘Frequently Asked Questions’.
Show Timeline of Changes: See how this legislation has or could change over time. Turning this feature on will show extra navigation options to go to these specific points in time. Return to the latest available version by using the controls above in the What Version box.
Opening Options
Different options to open legislation in order to view more content on screen at once
More Resources
Access essential accompanying documents and information for this legislation item from this tab. Dependent on the legislation item being viewed this may include:
- the original print PDF of the as enacted version that was used for the print copy
- lists of changes made by and/or affecting this legislation item
- confers power and blanket amendment details
- all formats of all associated documents
- correction slips
- links to related legislation and further information resources
Timeline of Changes
This timeline shows the different points in time where a change occurred. The dates will coincide with the earliest date on which the change (e.g an insertion, a repeal or a substitution) that was applied came into force. The first date in the timeline will usually be the earliest date when the provision came into force. In some cases the first date is 01/02/1991 (or for Northern Ireland legislation 01/01/2006). This date is our basedate. No versions before this date are available. For further information see the Editorial Practice Guide and Glossary under Help.
More Resources
Use this menu to access essential accompanying documents and information for this legislation item. Dependent on the legislation item being viewed this may include:
- the original print PDF of the as made version that was used for the print copy
- correction slips
Click 'View More' or select 'More Resources' tab for additional information including:
- lists of changes made by and/or affecting this legislation item
- confers power and blanket amendment details
- all formats of all associated documents
- links to related legislation and further information resources
 All content is available under the Open Government Licence v3.0 except where otherwise stated. This site additionally contains content derived from EUR-Lex, reused under the terms of the Commission Decision 2011/833/EU on the reuse of documents from the EU institutions. For more information see the EUR-Lex public statement on re-use.