Print Options
PrintThe Whole
Instrument
PrintThe Whole
Schedule
PrintThis
Part
only
Status:
This is the original version (as it was originally made).
PART 4Signs and markings indicating a congestion charging zone
Sign table — Schedule 8, Part 4
(1)
Item
| (2)
Sign description
| (3)
Sign diagram
| (4)
Permitted variants
|
|---|
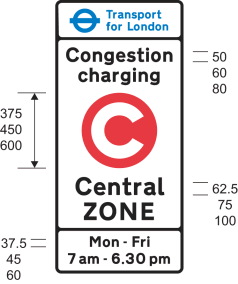
| 1 | Diagram 677
Entrance to a congestion charging zone
| | 1. The name and logo of the traffic authority in the upper panel may be varied as appropriate or the panel omitted
2. In the middle panel “Central” may be varied to the name of the zone as appropriate
3. In the lower panel—
(a) the time period may be varied; and
(b)(i) the amount of the charge and “Pay on entry” or “Pay on exit” or “per day” or “per vehicle” may be included above the time period; or
(ii) “Pay on entry” or “Pay on exit”, without the amount of the charge, may be included above the time period
|
| 2 | Diagram 678
Entrance to a congestion charging zone (alternative to item 1)
| | 1. In the upper panel “Axtley” may be varied to the name of the zone or to “Congestion” as appropriate
2. In the lower panel—
(a) the amount of the charge may be varied or omitted;
(b) “Pay on exit” may be varied to—
(i)”Pay on entry”; or
(ii) if the amount of the charge is not omitted, “per day” or “per vehicle”;
(c) “£2 Pay on exit” may be omitted; and
(d) the time period may be varied
|
| 3 | Diagram 818.6
Advance indication of a congestion charging zone
| | 1. In the upper panel the time period may be varied
2. In the lower panel—
(a) the distance may be varied;
(b) “ahead” may be placed centrally below the distance;
(c) “ahead” may be omitted and an arrow pointing horizontally to the left or to the right placed centrally below the distance
|
| 4 | Diagram 818.7
Advance indication of a congestion charging zone (alternative to item 3)
| | 1. In the upper panel—
(a) the amount of the charge may be varied;
(b) “day” may be varied to “vehicle”;
(c) the time period may be varied
2. In the lower panel—
(a) the distance may be varied;
(b) “ahead” may be placed centrally below the distance; and
(c) “ahead” may be omitted and an arrow pointing horizontally to the left or to the right placed centrally below the distance
|
| 5 | Diagram 894
Reminder to drivers within a congestion charging zone in which cameras are used to enforce traffic regulations
| | 1. The “C” symbol may be placed to the left of the camera symbol
2. A legend may be added giving the name, and any logo, of the enforcement authority
|
| 6 | Diagram 679
End of congestion charging zone
| | |
| 7 | Diagram 1068
Road marking indicating the commencement of a congestion charging zone
| | |
| 8 | Diagram 1069
Road marking giving advance warning of a congestion charging zone
| | |
Back to top